3D Studio Tutorials
Day 1. Intro Introduction video, Interface introduction, view ports,
Introduction to 3D space, create objects.
Day 2. Create Objects Create 3D Objects and 2D Objects in all view
ports. Create text and extrude. Create lofts of 2D Objects.
Day 3. Modify Objects Modify 3D Objects using bend, twist, taper, etc.
Modify 2D Objects using lathe and extrude and bevel. Create a champagne
glass using lathe.
Day 4. Create a cheeseburger. (See assignment sheet)
Day 5. Animation Create 3D Objects and animate. Animate movement and
rotation. Animate Modifications. Time Configuration. Key Frames. Frames
per Second. Time Ruler. Make Preview (.avi file). Track View (Hierarchy/Edit
View). Create key points and edit.
Day 6. Material Editor Create Shapes and open the material editor.
Get Material/Material Library (choose objects with blue circle), select
object and assign material. Modify UVW Map and adjust material. Create
new materials (color, shading, shininess, opacity). Assigning Bitmaps
(mapping).
Day 7. Lighting Create shapes and create lights. Ambient (color). Rendering
Environment. Omni (multidirectional). Cast Shadows. Target Spot-object.
Free Spot-direction. Hotspot, Falloff. Quick render different sets
and backgrounds. Animate Lights. CREATE AND LIGHT A SCENE
Day 8. Cameras Create 3D objects in a scene (objects on a plane, still
life scene on table). Create target camera. Free camera for Z axis
(up and down). Can move camera in two ways. See Camera perspective
and use movements in lower right or move camera itself. Animate camera
in movie. Render movie as .avi file to C Drive 320x240.
Day 9. Particle Systems, Time Warps, Rendering Differences between
Max and Viz. Create and link helpers/dummy. Create reactor example. Booleans. Environment
(fog and fire). Importing and exporting meshes. Online Max tutorials.
Day 10. Project Intro 1st project for 3 weeks. 2nd project for 4 weeks.
Can combine into one. Can choose own project. If want direction, see
me. Should create graphics and music in Premiere. Create scene then lights
then camera then animate. Export final movie. See project description
sheet.
Create a Cheeseburger
BUNS - Create a Sphere with radius 50 and segments 30. Choose the
correct color for your buns. Make .5 hemisphere to cut bun in
half. Use
Edit/Clone/Mirror/Instance to make copy of bun and flip to have
both halves. Go to Modify/Stretch
to alter shape.
PATTY - Create a cylinder with radius 60 and height 4. Make
the correct color and label as Patty.
CHEESE - Create a box that is smaller than Patty and make correct
color.
LETTUCE - Create a box that is smaller than cheese with width
and length segments 25. Make correct color. Modify/Noise and
check
fractal. Make
the parameters of the z axis strength 60 and seed 2. Label
as Lettuce.
TOMATO - Create Cylinder with height 2 and make correct color.
BACON - Create Box with length segment 5 and width segment
25. Modify/Noise and check fractal. Set z axis strength to
50 and
seed to7.
PICKLES and ONIONS - Use cylinders for pickles and tubes for
onions. Make copies for duplicates.
Save file to use later for animations and time warps.
Create and Light A Scene
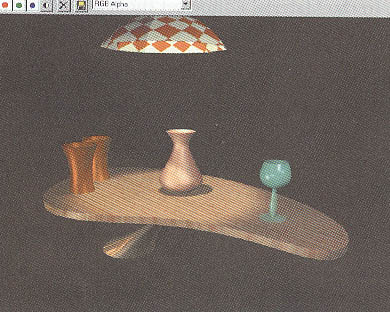
1. Create table base. Cylinder, taper, skew.
2. Create table top. Ellipse, extrude, position table top.
3. Edit the spline. Modify ellipse, vertex.
4. Create objects for table top. Tube, taper. Clone it for
a 2nd one.
5. Create a goblet. Lines, lathe.
6. Try to make a bowl.
7. Copy bowl to make lamp shade (sides 10, smooth:unchecked)
8. Light the scene
Lighting a scene: the fewer the better
Omni - points in all directions, doesn’t cast shadows
Target spotlights – provides adjustable cone of light
Free spotlights – not used often; without target, linking a light
to another object
Directional light (sunlight)
• Omni lights in lower-left and upper-right
• Target spot from lamp shade to table. (Adjust the falloff, check cast
shadows)
9. Add materials to objects. Make bowl transparent.
10. Animate objects on table.
11. Render your animated scene.
|