|
An Introduction to Tables
In the early days of web design, web pages consisted of merely text and images
and could only be justified to be placed in few locations. Design options were
very limited. When tables were introduced in to HTML, web design became effective
like it is today.
Making a Basic Table
Much alike a word processor, Dreamweaver and HTML in general use tables to
organize data correctly and efficiently. To make a basic table in Dreamweaver,
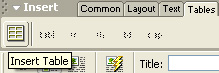
on the Insert tab up top, click the tab for Tables and then all
the way over on the left is the Insert Table button.
| Image |
 |
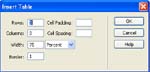
You should now have a bunch of new options for your table you want to create
up on the screen. As seen in the image below, the options in this dialogue box
for your table are the number of rows, the number of columns, the width of the
table in either pixels or percentage (this is important to note), the
width of the border on the table, the cellpadding, and the cellspacing.
There are many more advanced features in making tables, but these are the ones
you'll want to master first before moving on to the more advanced ones.
As an example, here is a table with 2 rows, 2 columns, a width
of 50%, a border of 1, a cellpadding of 3, and a cellspacing
of 3.
| Row 1, Column 1 |
Row 1, Column 2 |
| Row 2, Column 1 |
Row 2, Column 2 |
This is the dialogue box which appears when you are creating a table in Dreamweaver.
| Image |
 |
| Click on the thumbnail to enlarge... |
On to Page 2
|
|